Adobe After Effects Tutorial: Understanding the After Effects workspace in After Effects
What you’ll learn in this After Effects Tutorial:
|
This tutorial provides you with a foundation for working with Adobe After Effects interface. It is the second lesson in the Adobe After Effects CS6 Digital Classroom book. For more Adobe After Effects training options, visit AGI’s After Effects Classes. |
Adobe After Effects Tutorial: Understanding the After Effects workspace in After Effects
The organization and positioning of all the panels on-screen is called the workspace. After Effects comes equipped with a series of preset workspaces that you can use. After Effects displays certain panels depending upon the workspace selected, and they are named based upon common tasks you might need to perform. Some of these default workspaces are: All Panels, Animation, Minimal, Motion Tracking, Paint, Standard, Text, and Undocked Panels. When you run After Effects for the first time, the application displays the Standard workspace.
Viewing and hiding panels in After Effects
To modify your workspace, you can open, hide, move, resize, float, or dock panels. This functionality makes the After Effects interface customizable to meet your preferences and working style. After deciding which panels you want to display, close any panels you will not need and open the ones you plan to use. Next, you will work with a variety of application panels to customize and then save your own custom workspace.
You do not need to open a project to complete this section of the lesson.
1 Choose Window > Workspace > Animation to change the current workspace. The Animation workspace has several common tools that you can use when animating your work, and you can customize it to meet your needs.
2 If it is not already active, click the Info panel’s tab to activate it and bring it to the front of its panel group. Click the X at the top of the Info panel to hide it. This leaves the Audio panel active in this group. Click the X icon to also close the Audio panel.
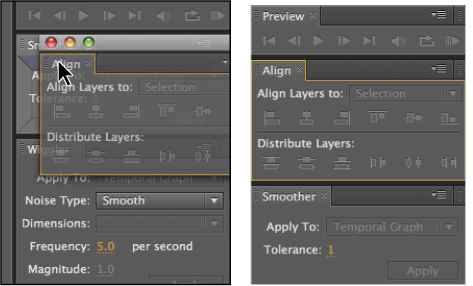
3 Choose Window > Align to open the Align panel. It appears in the bottom-right corner of the interface, directly below the Effects & Presets panel.
4 Click the X icon in the tab of the Effects & Presets panel to close it. This causes the Align panel to move.
In the next section, you will reconfigure the workspace so the Align panel is placed in a more convenient area of the workspace.
Docking and undocking panels in After Effects
After Effects panels are docked to the sides of the application window and also to each other. This creates a very stable, interlocked interface that can scale to fit a wide range of screen resolutions. Occasionally, you might find that the default docked configuration is not advantageous. In such cases, you can change the default by docking and undocking panels to suit your work habits. A situation in which you may need to undock a panel or multiple panels in the applications is when you are working with system configurations that make use of multiple computer monitors.
1 Click the tab at the top of the Align panel. Press and hold the Ctrl (Windows) or Command (Mac OS) key on your keyboard while dragging the Align panel to the center of the screen. This removes the panel from the docked interface, making it an undocked, or floating, panel.
 | If you are using a multiple monitors, you will need to use the Undocked Panels workspace to freely position the panels across your screens. When working with a single display, undocked panels often create more problems than they solve by obscuring the rest of the interface and hiding important areas of your compositions from view. |
2 Click the Align panel’s name tab and drag the panel toward the Smoother panel at the top-right corner of your interface. Because you are no longer holding down the Ctrl (Windows) or Command (Mac OS) key, you will notice that a gray and purple overlay now appears as you move the panel around the screen. This is called a drop zone, and it highlights areas where you can drag and drop your panel to dock it.
3 Position the Align panel toward the top of the Smoother panel. The top section of the drop zone becomes highlighted. The highlight appears when your mouse is hovering right below the Smoother panel’s name tab. Release the mouse while this section is highlighted to position the panel between the Preview and Smoother panels as a separate, individual panel.
|
Dock the Align panel so that it rests above the Smoother panel. |
Using drop zones
Drop zones are a unique feature of the After Effects panel interface. They make it easier to use the docked panels by providing you with visual cues as you drag panels to rearrange them.
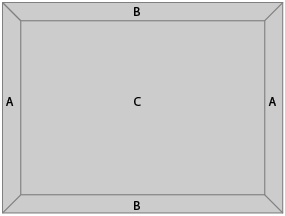
As you drag a panel around the interface, a drop-zone overlay appears above the current panel group that your cursor is hovering over. Different sections of the drop zone become highlighted to show you what your new panel configuration will be. If either section on the sides (labeled “A” in the figure) illuminates, the panel that you are repositioning will be placed to the side of the currently highlighted panel, creating a new, independent panel group vertically. The same is true for the top and bottom of the drop zone (labeled “B” in the figure), except this creates a new panel group horizontally. The third possibility is to release your mouse while hovering over the center of the drop zone (labeled “C” in the figure); this groups the panel that you are moving with the existing panel group, creating a new tab.
Resizing After Effects panels
In addition to hiding, opening, docking, and undocking panels, the After Effects interface lets you easily resize docked panels so they take up more or less space on the display.
1 Place the cursor on the dark-gray, vertical dividing line between the Composition and Project panels. The cursor changes to a double arrow ( ) when it is hovering over the dividing line.
|
A double-arrow resize cursor appears between the panels enabling you to resize them. |
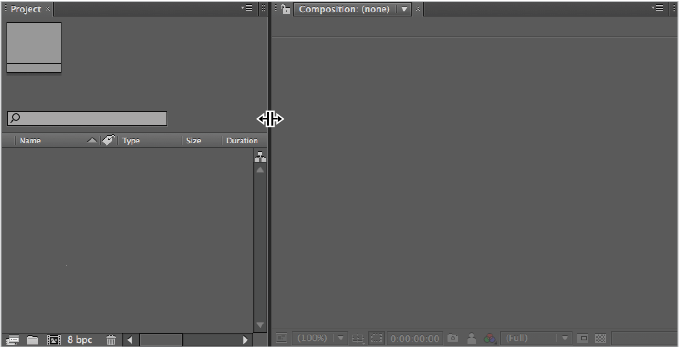
2 Click and drag the dividing line toward the Project panel to increase the size of the Composition panel.
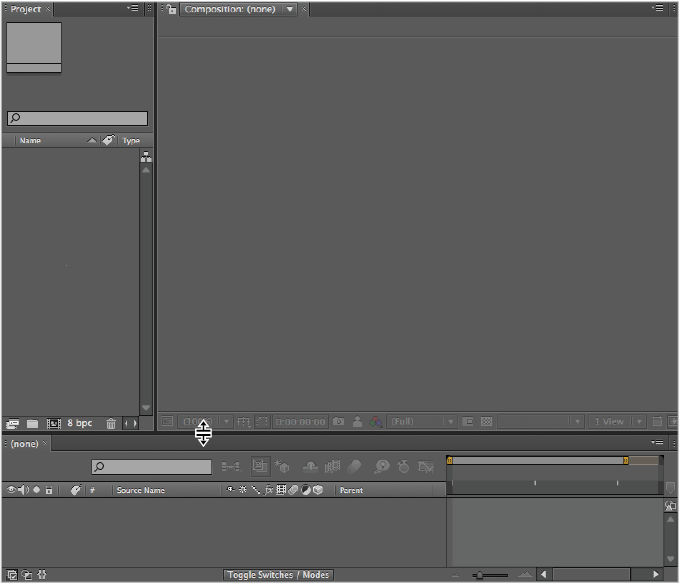
3 Position the cursor on the dark-gray, horizontal dividing line between the Composition and Timeline panels. Drag the dividing line down to shrink the Timeline panel and make the Composition panel larger.
|
Resize the panels to make the Composition panel larger. |
Continue to the next After Effects Tutorial: Saving a custom workspace in After Effects >