Illustrator tutorial: Editing existing paths in Illustrator
What you’ll learn in this Illustrator Tutorial:
|
This tutorial provides you with a foundation for working with Adobe Illustrator panels. It is the first lesson in the Adobe Illustrator CC Digital Classroom book. For more Adobe Illustrator training options, visit AGI’s Illustrator Classes. |
Adobe Illustrator Tutorial: Editing existing paths in Illustrator
In addition to creating lines and shapes, the tools in Illustrator provide the ability to modify paths that you have already created. The two main ways to do this are by adding or removing anchor points to a path, and converting anchor points from smooth to corner points, or vice versa.
Adding and removing points
The best way to modify paths in your artwork is to add or remove anchor points from an existing path. Both the Pen tool and the Control Panel can be used to modify the anchor points. You will now complete Exercise 5.
1 Using the Selection tool ( ), select the first path in Exercise 5 to highlight it, then choose the Pen tool (
 ) from the Tools panel.
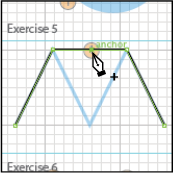
2 Place the Pen tool over the portion of the path at label 1. The new cursor ( ) indicates that clicking with the Pen tool will create an anchor point on the line segment. Click on the line segment to create a new anchor point.
|
Create a new anchor point. |
3 The anchor point that was just created is automatically highlighted. Use the arrow keys on your keyboard to move this anchor point into position to match the template.
|
Move the anchor point using the |
4 Now you’ll move to the next template. Choose the Direct Selection tool ( ) from the Tools panel, and draw a selection marquee around the anchor point at label 2 to highlight it.
|
Select the anchor point. |
5 Click the Remove Selected Anchor Points button ( ) in the Control panel to remove the highlighted anchor point from the line and make it match the template.
 | When the path is selected, you can also use the Pen tool to remove an anchor point. The only disadvantage to using the Pen tool to remove anchor points is that it cannot remove points from the beginning or end of a line. |
6 Choose File > Save to save your work.
Refining a curve
You will now experiment with curved paths by completing Exercise 5 in the ai0504_work.ai lesson file.
1 Locate the third and final path in Exercise 5. Using the Direct Selection tool (), draw a selection marquee around the anchor point at label 3.
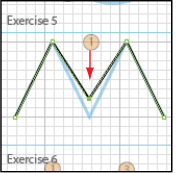
2 Click the Convert Selected Anchor Point to Corner button ( ) in the Control panel to change the smooth point into a corner point. This changes the curvature of the preceding line segment.
|
The curve changes. |
3 With the line still selected, click and hold the Pen tool () in the Tools panel, then select the Convert Anchor Point tool ().
4 Select the anchor point at label 4 to convert it from a smooth point to a corner point.
| If you want to convert a corner point to a smooth point, you can do so either from the Control panel or by clicking and dragging on a corner point with the Convert Anchor Point tool. |
5 Press Ctrl+Shift+A (Windows) or Command+Shift+A (Mac OS) to deselect everything on the artboard. Choose File > Save to save your work.
Cutting and joining paths
One of Illustrator’s very helpful features is the ability to cut and join paths. Paths can be cut either at anchor points or line segments, but they may only be joined by connecting two adjacent anchor points, called end points. You will now complete Exercise 6.
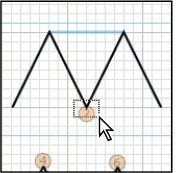
1 Select the Direct Selection tool () from the Tools panel, and draw a selection marquee around the anchor point at label 1.
|
Draw a marquee around the |

2 Click the Cut Path at Selected Anchor Points button ( ) in the Control panel to sever the path at this point. Repeat this step for the anchor point at label 2.
3 Click and hold the Eraser tool ( ) in the Tools panel to reveal and select the Scissors tool (
 ). Click on the anchor point at label 3. This tool performs the same function as the Cut Path at Selected Anchor Point button in the Control panel.
| If you miss the anchor point even by a little, the Scissors tool displays an error message and you have to try again. |
4 Choose the Selection tool () in the Tools panel, and use it to move the individual line segments apart to the positions of the blue lines in the template.
5 Select the Direct Selection tool and draw a selection marquee around the two end points located at label 4. Zoom in if necessary to confirm that these end points are not connected.
6 Click the Connect Selected End Points button ( ) in the Control panel. This merges the two anchor points into one.
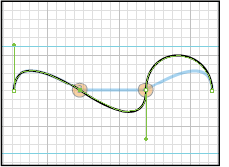
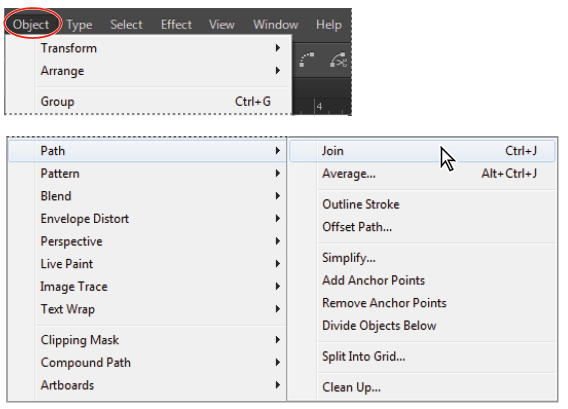
7 Select the Direct Selection tool and draw a selection marquee around the two end points located at label 5. Zoom in if necessary to confirm that these end points are not connected. Select Object > Path > Join. If a Join dialog box appears, select Corner and click OK.
|
Select Object > Path > Join. |
8 Select the two end points located at label 6 by clicking and dragging to create a marquee containing both points, then right-click (Windows) or Ctrl+click (Mac OS) on the page and choose Join from the contextual menu.
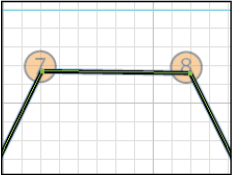
9 Select the two end points located at labels 7 and 8 by drawing a selection marquee using the Direct Selection tool.
10 Click the Connect Selected End Points button () in the Control panel. A line connecting the two selected end points is created.
|
The two end points are connected. |
| You can select two end points and press Ctrl+J (Windows) or Command+J (Mac OS) to create a connecting path to each end point. If you want to move the end points to meet (not create a new path) you can select both end points and press Shift+Ctrl+Alt+J (Windows) or Shift+Command+Option+J (Mac OS). |
11 Choose File > Save, then choose File > Close.
Continue to the next Illustrator Tutorial: Combining shapes using the Shape Builder tool in Illustrator >