Illustrator tutorial: Illustrator CC Essentials
What you’ll learn in this Illustrator Tutorial:
|
This tutorial provides you with a foundation for working with Adobe Illustrator essentials. It is the first lesson in the Adobe Illustrator CC Digital Classroom book. For more Adobe Illustrator training options, visit AGI’s Illustrator Classes. |
Adobe Illustrator Tutorial: Illustrator CC Essentials
Illustrator is used to create many types of artwork from simple icons to complicated illustrations and technical documentation. In this lesson, you’ll use the shape tools, work with basic selection techniques, and complete artwork. Along the way, you will learn some helpful tips for creating artwork on your own.
Starting up
Before starting, make sure that your tools and panels are consistent by resetting your workspace. See “Resetting Adobe Illustrator CC Preferences” in the Starting up section of this book.
You will work with several files from the ai01lessons folder in this lesson. Make sure that you have loaded the CClessons folder onto your hard drive from the supplied DVD. See “Loading lesson files” in the Starting up section of this book.
Using the shape tools
Making shapes is an important part of using Adobe Illustrator. In Illustrator Lesson 3, “Working with the Drawing Tools,” you learn how to make your own custom shapes and lines using the Pen tool, but many times you will work with shapes that are ready-to-go, right off the Tools panel.
Though it may seem simple if you have used Illustrator before, transferring a shape from the Tools panel to the artboard can be a little confusing for new users. To start this lesson, you’ll create a new blank document; think of it as a piece of scratch paper that you can use for practice. You will put a number of shapes on this new document throughout the exercise; feel free to delete or reposition them as you move on to make room for new ones. You won’t use this document in any other lessons.
1 In Illustrator, choose File > New, or use the keyboard shortcut Ctrl+N (Windows) or Command+N (Mac OS). The New Document dialog box appears.
2 If they are not already selected, choose Print from the New Document Profile drop-down menu and Inches from the Units drop-down menu. When you change the units to inches, the New Document Profile setting changes to [Custom]. Keep in mind that the Document Profile can be changed after the file has been created, as can the units of measurements.
|
Specify the settings of your new Illustrator document. |
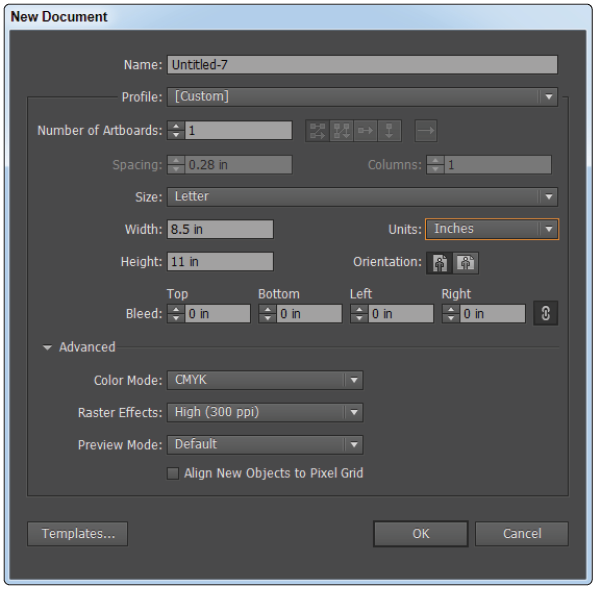
3 Click OK. A new blank document appears.
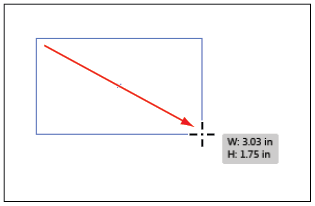
4 Select the Rectangle tool ( ) from the Tools panel. Click and drag anywhere on the artboard. By clicking and dragging, you determine the placement and size of the rectangle. Typically, you would pull from the upper-left corner diagonally to the lower-right corner.
|
Click and drag from the upper-left corner to the |
5 It is wise to save your files often after you start working. Choose File > Save As to save this file. The Save As dialog box appears.
6 Type ai0301_work into the File name (Windows) or Save As (Mac OS) text field, leave the Save as type as Adobe Illustrator (AI), and then navigate to the ai01lessons folder. Click Save.
7 When the Illustrator Options dialog box appears, leave the version set to Illustrator CC and click OK. The file is saved.
 | If you are not able to save in the ai01lessons folder, the folder may be locked. See the Starting up section at the beginning of this book for instructions on how to unlock your lessons folder. |
Repositioning and visually resizing the rectangle
Now that you have your first shape on the page, perhaps you want to relocate it or alter its shape or size.
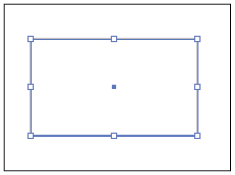
1 Choose the Selection tool ( ) from the Tools panel. A bounding box with eight handles appears around the rectangle you just drew. If you do not see the eight handles, make sure you have the rectangle selected by clicking on it once. If the bounding box is still not visible, choose View > Show Bounding Box. The bounding box is a feature that can be toggled on or off, and that allows you to transform a shape without leaving the Selection tool.
|
The bounding box provides handles to |
2 Using the Selection tool, click inside the rectangle and drag it to another location on the page (do not click on the handles, as that resizes the shape).
| If you click inside a shape and it becomes unselected, it probably has no fill. Fill and stroke are discussed in Illustrator Lesson 2, “Adding Color.” By pressing the letter D, you revert back to the default white fill and black stroke, then you can easily select the shape. |
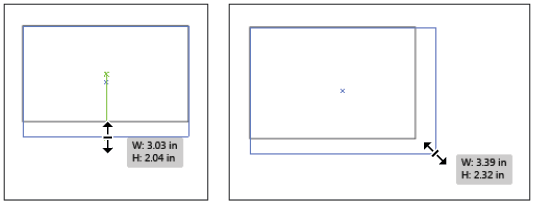
3 Hover over the bottom-middle handle until the cursor becomes a vertical arrow and the word path appears. Click and drag. When you click on a middle handle and drag, you adjust the size of the selected handle’s side only.
4 Click on a corner handle and drag. When you click on a corner handle, you adjust both sides that are connected to the corner point.
|
Click and drag a middle point. Click and drag a corner point. |
5 Choose File > Save to save your work.
Finding or changing the shape’s dimensions using the Transform panel
What if you need to know a shape’s dimensions, or need it to be an exact size? This is when you should refer to the Transform panel.
1 Make sure the rectangle is still selected and open the Transform panel by choosing Window > Transform. The Transform panel appears. The values displayed are for the selected item, which in this case is the rectangle.
The Transform panel displays information about the rectangle’s location and size. Here is something to keep in mind: the values (except for the X and Y values, which refer to the selected reference point) displayed in the Transform panel refer to the rectangle’s bounding box. By default, the reference point is the center of the shape.
|
The center reference point locator The reference point in the shape. |
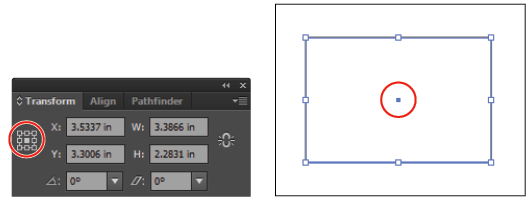
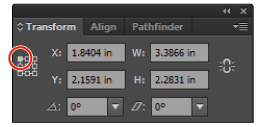
2 Click on the upper-left corner of the reference point locator to see that the X and Y values change, reflecting the shape’s position based upon the upper-left corner as the reference point. Because you created your rectangle without given parameters, its values are different from those displayed in the figure below.
|
The X and Y coordinates change depending |
3 Choose View > Rulers > Show Rulers to display the rulers, or use the keyboard shortcut Ctrl+R (Windows) or Command+R (Mac OS).
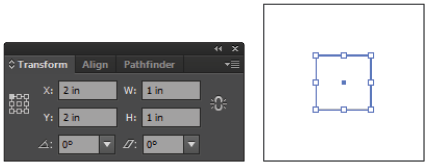
4 In the Transform panel, type 2 into the X text field and press the Tab key to move the cursor to the Y text field. Type 2 into the Y text field. Make sure the Constrain Width and Height proportions button ( ) is not selected, then type 1 into the W (Width) text field and 1 into the H (Height) text field. The rectangle is now positioned and sized according to these values.
|
Manually enter values. The result. |
5 Choose File > Save to save your work.
Rotating and shearing using the Transform panel
You can also use the Transform panel to enter exact rotation and shear values for the shapes on the artboard.
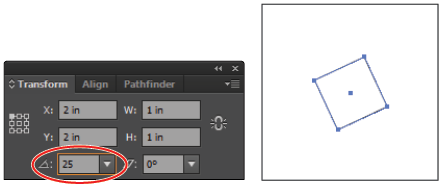
1 With the shape still selected, type 25 into the Rotate text field at the bottom of the Transform panel and press Enter (Windows) or Return (Mac OS). The square rotates 25 degrees counterclockwise and the dimensions in the Transform panel are updated.
|
Type 25 into the Rotate text field. The result. |
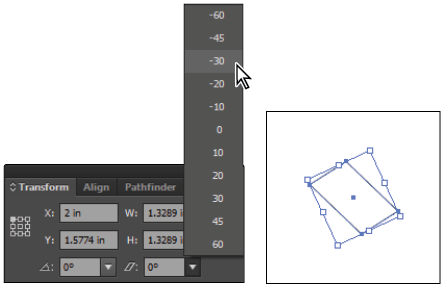
2 Click and hold on the arrow to the right of the Shear text field and choose -30° from the drop-down menu. Illustrator shears the shape by 30 degrees.
|
Choose a value from the Shear The result. |
Constraining a shape
You have created a shape visually and then used the Transform feature to make the rectangle a square. You can also use keyboard commands to create the shape that you want right from the Tools panel.
1 Select the Rectangle tool () from the Tools panel.
2 Hold down the Shift key and click and drag on an empty area on the artboard. Note that the Shape tool is constrained to create a square. In order for the finished product to remain a square (and not become a rectangle), you must release the mouse before you release the Shift key. Now try this with the Ellipse tool.
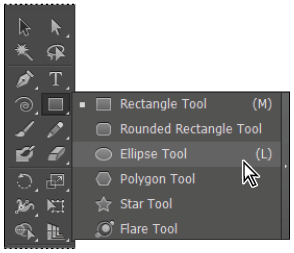
3 The Ellipse tool ( ) is hidden beneath the Rectangle tool. Click and hold on the Rectangle tool in the Tools panel to reveal and select the Ellipse tool.
|
Select the hidden Ellipse tool. |
4 Hold down the Shift key, click on an empty area of the artboard, and drag to create a circle. Remember to release the mouse before you release the Shift key to keep the shape a circle.
5 Choose File > Save. Keep this file open for the next part of the lesson.
Entering exact dimensions
You can also modify a shape’s properties and dimensions through the shape tool’s dialog box. You’ll do that now using the Ellipse tool.
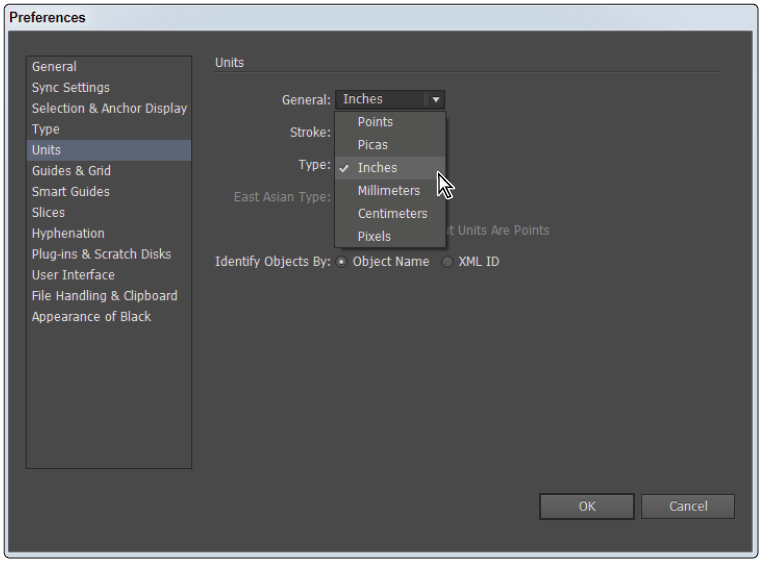
Before you start, you should know where to set the units of measurement. Even after indicating that you want the rulers to use inches, you may still have values recognized in points.
1 Choose Edit > Preferences > Units (Windows) or Illustrator > Preferences > Units (Mac OS). The Preferences dialog box appears.
2 Select Inches from the General drop-down menu, if it is not already selected. Leave all other measurements the same and click OK.
|
Change the general units of measurements to inches. |
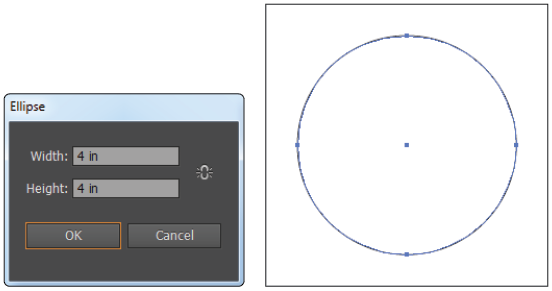
3 Using the Ellipse tool (), click once on the artboard. The Ellipse dialog box appears.
| If the Ellipse dialog box does not appear, you may have inadvertently clicked and dragged. Even a slight drag instructs Illustrator to create a tiny shape rather than open the dialog box. If this happens, press Ctrl+Z (Windows) or Command+Z (Mac OS) and click on the artboard again. |
4 Type 4 into the Width text field, and then press the Tab key to highlight the Height text field. Type 4 into the Height text field and click OK.
|
Change the Width and Height to The result. |
You can use this same method to change shape options.
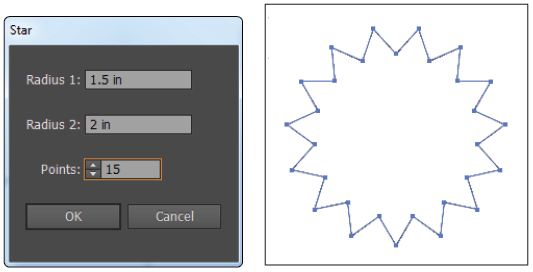
5 Hidden beneath the Ellipse tool in the Tools panel are a number of other shape tools. Click and hold the Ellipse tool to see the other options. Select the Star tool ( ) and click once on a blank area of the artboard. The Star dialog box appears.
6 Set the star’s Radius 1 to 1.5 inches and its Radius 2 to 2 inches; then type 15 in the Points text field. Click OK.
|
Enter star values. The result. |
7 Choose File > Save, then File > Close. You won’t be working with this file anymore.
You will now create a basic illustration using some of these basic shapes as well as additional fundamental features.
Selecting artwork
In this part of the lesson, you will receive a quick primer on the selection tools and techniques in Adobe Illustrator. As the old saying goes, you have to select it to affect it. You need to know how to select objects in order to reposition, color, transform, and apply effects to them.
Helpful keyboard shortcuts for selections | ||
Function | Windows | Mac OS |
Switch to last-used selection tool | Ctrl | Command |
Switch between Direct Selection tool and Group Selection tool | Alt | Option |
Add to a selection | Shift+click | Shift+click |
Subtract from a selection | Shift+click | Shift+click |
Change pointer to cross hair for selected tools | Caps Lock | Caps Lock |
Continue to the next Illustrator Tutorial: The selection tools in Illustrator >