Illustrator tutorial: The selection tools in Illustrator
What you’ll learn in this Illustrator Tutorial:
|
This tutorial provides you with a foundation for working with Adobe Illustrator panels. It is the first lesson in the Adobe Illustrator Digital Classroom book. For more Adobe Illustrator training options, visit AGI’s Illustrator Classes. |
Adobe Illustrator Tutorial: The selection tools in Illustrator
While there are several selection tools in Adobe Illustrator, the three main tools are the Selection tool, the Direct Selection tool, and the Group Selection tool. You will have an opportunity to experiment with selections in this part of the lesson.
1 Choose File > Open and navigate to the ai01lessons folder. Select the file named ai0302.ai and click Open. A file opens with a completed fish illustration on the top and the individual components of that fish at the bottom. The top fish artwork is locked and not accessible; use this for reference as you follow the exercise.
2 Choose File > Save As. The Save As dialog box appears.
3 Type ai0302_work into the File name text field and click Save. When the Illustrator Options dialog box appears, click OK.
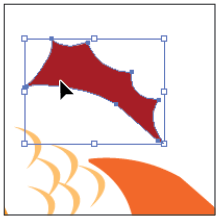
4 Choose the Selection tool ( ) from the Tools panel and pass the cursor over the shape pieces at the bottom of the artwork. As you pass over the objects, notice that the cursor changes to reflect where there are selectable objects. Do not click to select any of these objects just yet.
|
Selectable object. Anchor point. No selectable object. |

5 Click on the large red fin; the entire fin is selected. If you do not see the bounding box appear around the fin, choose View > Show Bounding Box.
|
The entire shape is selected and has |
6 Click and drag to reposition the fin anywhere on the page. When you use the Selection tool, you select an entire object or group.
7 Choose the Direct Selection tool ( ) from the Tools panel. Using this tool allows you to select individual points or path segments of an object.
8 Without clicking on the selected large fin, reposition the cursor over one of the tips of the fin to see how the cursor changes to indicate that there is a selectable anchor beneath the cursor. A light-gray box giving the X- and Y-coordinates of the anchor point also appears. Click when you see the arrow with the small white square.
|
Cursor changes to show Individual anchor point selected. |
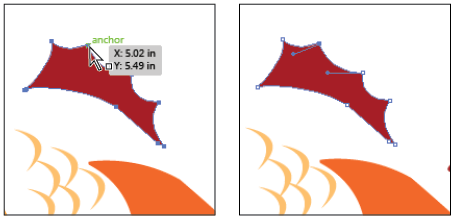
9 Notice that only the anchor point that you clicked on is solid; all the other anchor points are hollow and not active.
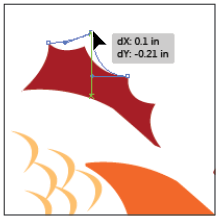
10 Click on the solid anchor point and drag upward to reposition the anchor point and change the shape of the fin. By using the Direct Selection tool, you can alter the shape of an object.
|
Click and drag with the Direct |
11 Press Ctrl+Z (Windows) or Command+Z (Mac OS) to undo the last step, or choose Edit > Undo Move.
12 Choose File > Save. Keep this file open for the next part of this lesson.
Grouping the scales
You will now turn the individual scales in the artwork into a group that you can move and modify as a collective unit.
1 Activate the Selection tool (). Click on one of the pale orange scales, then add to the selection by holding down the Shift key and clicking on one of the other five scales.
|
Shift+click to add to the selection. |
2 With the two scales selected, choose Object > Group or use the keyboard shortcut Ctrl+G (Windows) or Command+G (Mac OS). The two scales are grouped together. When you select one with the Selection tool, the other is also selected.
3 Shift+click a third scale to add to the selection, then Shift+click the remaining scales. All the scales are now selected.
4 Press Ctrl+G (Windows) or Command+G (Mac OS) to group all six scales together.
5 Choose Select > Deselect, or press Shift+Ctrl+A (Windows) or Shift+Command+A (Mac OS), to deselect the scales.
6 Using the Selection tool, click on one of the first scales you selected. The scales act as a collective group now, and all the scales are selected.
7 Press Shift+Ctrl+A (Windows) or Shift+Command+A (Mac OS) to deselect everything again.
You will now use the Group Selection tool to select individual items in a group.
8 Click and hold down on the Direct Selection tool () in the Tools panel and choose the hidden Group Selection tool ( ).
).
9 Click once on the top-most scale of the group; only the one scale is selected.
10 Now click on the same scale again and the second scale that you grouped back in step 2 also becomes selected.
11 Click on the same scale a third time and the entire last group of items becomes selected. By using the Group Selection tool, you can select individual items and even groups within groups.
12 With all the scales selected, click and drag the scales on top of the fish’s orange body.
|
Click and drag to reposition the scales. |

13 Now switch back to the Selection tool to reposition the rest of the separate components together to complete the fish. The positioning guides help you to best position and arrange the different pieces into one fish.
|
The completed fish. |

14 Choose File > Save, then File > Close to close the document. You won’t be working with this file anymore.
Isolation mode |
Isolation mode is an Illustrator mode in which you can select and edit individual components or sub-layers of a grouped object. There are four ways to enter into isolation mode:
|
 ) in the Control panel.
 ).
).Using shape and transform tools to create artwork
You will add to the basics that you have discovered to complete some different fish artwork.
1 Choose File > Open and navigate to the ai01lessons folder. Double-click on ai0303_done.ai to open the file in Adobe Illustrator. Artwork of two swimming fish appear.
2 This is the file you will create. You can choose File > Close, or keep it open for reference throughout this exercise.
|
You can leave this file open for |

3 Choose File > Open, navigate to the ai01lessons folder, and double-click on the ai0303.ai file. A document with four guides in the center of the page opens.
4 If your units are not in inches choose Edit > Preferences > Units (Windows) or Illustrator > Preferences > Units (Mac OS) and change the measurement units in the General drop-down menu to Inches. Click OK.
5 Choose File > Save As. The Save As dialog box appears.
6 Type ai0303_work into the File name text field and navigate to the ai01lessons folder you saved on your hard drive; then click Save.
7 When the Illustrator Options dialog box appears, click OK.
Continue to the next Illustrator Tutorial: Using the transform tools in Illustrator >