Illustrator tutorial: Using the transform tools in Illustrator
What you’ll learn in this Illustrator Tutorial:
|
This tutorial provides you with a foundation for working with Adobe Illustrator panels. It is the first lesson in the Adobe Illustrator CC Digital Classroom book. For more Adobe Illustrator training options, visit AGI’s Illustrator Classes. |
Adobe Illustrator Tutorial: Using the transform tools in Illustrator
There are several basic transform tools. Though each performs a different task, they are essentially used in the same manner.
|
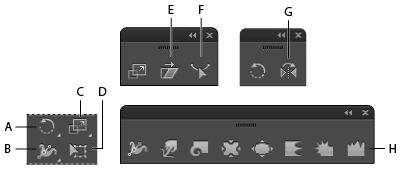
A. Rotate. B. Width tool. C. Scale. D. Free Transform. E. Shear. |
You used the Transform panel to rotate and shear earlier in this lesson. You will now use the transform tools to make changes by entering exact values.
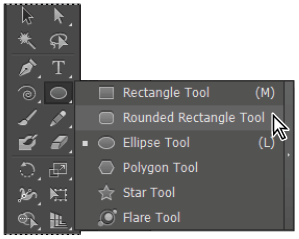
1 Click and hold on the Star tool ( ) in the Tools panel to reveal the hidden tools. Select the Rounded Rectangle tool (
 ).
).
|
Select the Rounded Rectangle tool. |
2 Click and drag to create a rectangle with rounded corners of any size.
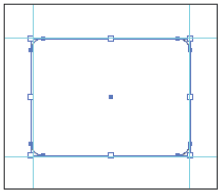
3 Activate the Selection tool ( ) and, using the bounding box’s anchors, click and drag until the rounded rectangle fits the dimensions of the guides located in the center of the document.
|
Manually drag anchors to fit the |
Adding a fill color
You will now fill the rounded rectangle with a color.
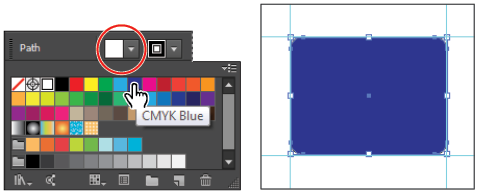
1 Make sure the rounded rectangle is still selected. If it is not selected, click on it using the Selection tool ().
2 Locate the Control panel at the top of your workspace and click on the Fill box on the left side of the panel. Color swatches appear, from which you can choose a color. Pass your cursor over the swatches, and each color’s name appears in a tooltip. Select the color named CMYK Blue. If the tooltip does not appear, select the color you see highlighted in the figure below. The shape’s fill becomes blue.
|
Select CMYK Blue for the fill. The result. |
3 Lock the selected rectangle by pressing Ctrl+2 (Windows) or Command+2 (Mac OS), or by choosing Object > Lock > Selection. This makes it impossible to select the rectangle unless you unlock it. This feature is extremely helpful when you start creating more complicated artwork.
Modifying a shape
You will now use the shape tools to create and add light rays to the illustration.
1 From the list of hidden shape tools beneath the Rounded Rectangle tool in the Tools panel, select the Polygon tool ( ) and click once on the artboard. The Polygon dialog box appears.
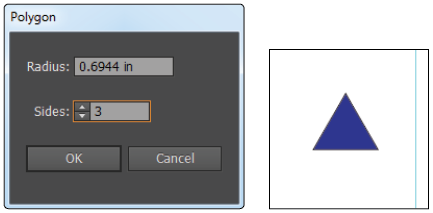
2 Leave the radius as it is; type 3 into the Sides text field and click OK. A triangle is drawn.
|
Change the amount of sides. The result. |
3 Choose the Selection tool (), and click and drag the top-center anchor of the bounding box upward, to stretch the triangle.
4 Elongate the triangle more by clicking on the lower-right corner of the bounding box, pulling down, and dragging the anchor to the left.
|
Click and drag upward. Drag inward and down. The result. |

By clicking and dragging the anchor, you visually resize the shape.
Entering a shape size in the Transform panel
For the purpose of this illustration, you will use the Transform panel to make sure that the triangle is sized correctly.
1 If it is not visible, choose Window > Transform, or click on the word Transform in the Control panel. The Transform panel appears.
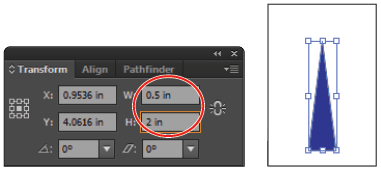
2 With the triangle still selected, type .5 in the W (Width) text field, and type 2 into the H (Height) text field. Press Enter (Windows) or Return (Mac OS).
|
Enter values in the Transform panel. The result. |
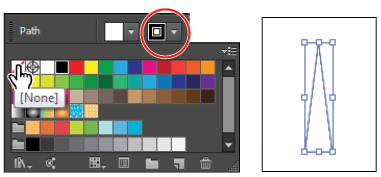
3 Press D; the triangle’s color reverts to the default white fill and black stroke colors.
4 Click once on the Stroke box in the Control panel at the top of the Illustrator work area and select None from the Stroke swatches drop-down menu. The triangle is not visible at this time (as it is white on a white background), but you can still see its anchor points.
|
Change the stroke color to None. The result. |
Viewing in Outline view
By default, previews of Adobe Illustrator artwork are in color. There will be times, however, when you create shapes that are white, or possibly have no fill or stroke color. Finding these items on your white artboard after you deselect them can be difficult. This is where Outline view can help.
1 With the Selection tool (), click somewhere on the artboard to deselect the triangle. Unless your triangle crosses over the rectangle you created earlier, you can no longer see the shape.
2 Choose View > Outline, or press Ctrl+Y (Windows) or Command+Y (Mac OS). Outline view displays artwork so that only its outlines (or paths) are visible. Viewing artwork without fill and stroke attributes speeds up the time it takes Illustrator to redraw the screen when working with complex artwork; it is also helpful when you need to locate hidden shapes.
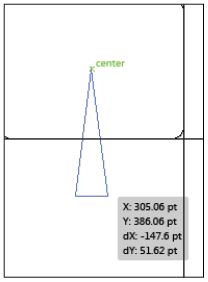
3 With the Selection tool, click on one of the triangle’s sides and reposition it so its tip touches the center (indicated by an X) of the rectangle.
|
The triangle and rectangle arranged |
4 Choose View > Preview, or press Ctrl+Y (Windows) or Command+Y (Mac OS) once more. The color attributes are visible again.
Rotating the shape
You will now create a series of triangle shapes and rotate them 360 degrees, creating what will look like rays of light.
1 Make sure the triangle is selected.
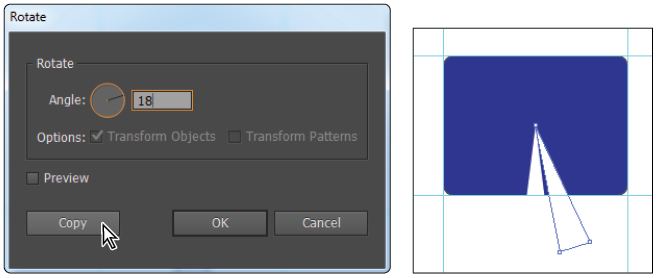
2 Select the Rotate tool ( ) from the Tools panel. The Rotate tool allows you to visually rotate objects, as well as enter specific rotation angles. In this example, you will enter values so that the triangles are evenly spaced.
3 Alt+click (Windows) or Option+click (Mac OS) the tip of the triangle aligned with the rectangle’s center. When you have the Rotate tool selected, and you Alt+click (Windows) or Option+click (Mac OS) on the artboard, you define the reference point from which the selected shape is rotated. Doing this also displays the Rotate dialog box, in which you can enter an exact value for the angle.
4 Type 18 into the Angle text field and click Copy. This rotates a copy of your triangle 18 degrees and keeps the original triangle intact. The value of 18 degrees evenly divides into 360 degrees, which will make the distribution of these rays even when you circle back to the starting point.
|
Enter rotate values and click Copy. A rotated copy is created. |
5 Press Ctrl+D (Windows) or Command+D (Mac OS) to repeat the transformation. The triangle shape copies, and rotates again.
6 Continue to press Ctrl+D (Windows) or Command+D (Mac OS) until you reach the original triangle.
|
The triangle after being rotated. |

7 If you are still in Outline view, press Ctrl+Y (Windows) or Command+Y (Mac OS) to return to the Preview view.
Changing the color of the triangles
You will now select the triangles and change their opacity.
1 Switch to the Selection tool () and select any one of the white triangles.
2 Choose Select > Same > Fill Color and all the white triangles become selected. The Select > Same feature can be helpful when selecting objects that share a common feature, including fill color, stroke color, stroke point size, and more.
3 Choose Object > Group. Grouping these shapes together makes it easier to select them later.
4 Type 50 into the Opacity text field in the Control panel and press Enter (Windows) or Return (Mac OS) to change the opacity of the white triangles to 50 percent.
|
Select the triangles and change the opacity to 50 percent. |

5 Choose File > Save to save your work.
Continue to the next Illustrator Tutorial: Using layers when building an illustration in Illustrator >