Photoshop Elements Tutorial: Correcting selected parts of an image in Photoshop Elements
What you’ll learn in this Photoshop Elements Tutorial:
|
This tutorial provides you with a foundation for working with hue adjustments in Adobe Photoshop Elements. It is the fourth lesson in the Adobe Photoshop Elements 10 Digital Classroom book. |
Photoshop Elements Tutorial: Correcting selected parts of an image in Photoshop Elements
Sometimes you need to change only parts of an image. In this exercise, you will create an adjustment layer that affects only a certain color, then you’ll learn how to make selections, save them, put them on a new layer, and edit them individually.
Hue/Saturation adjustments
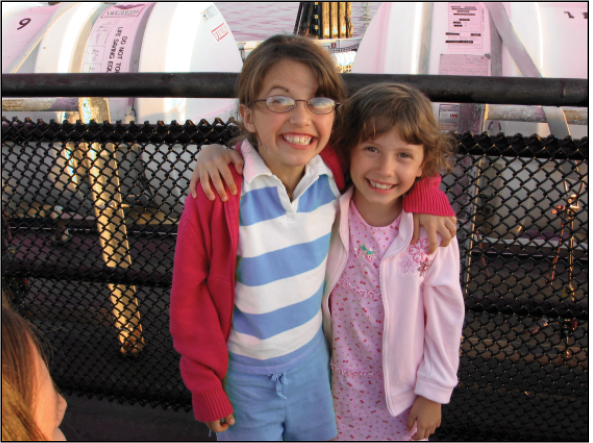
For this exercise, you will change a girl’s green striped shirt to blue stripes using a Hue/Saturation Adjustment Layer.
1 Press the Organizer button ( ) at the top of the Editor workspace. This reveals the Organizer.
2 Locate and select the file named blue_stripes.jpg. You’ll adjust the color of this image using a Hue/Saturation adjustment layer. Press the arrow to the right of the Fix tab at the top of the workspace and choose Full Photo Edit from the drop-down menu.
|
The blue_stripes.jpg image. |

3 At the bottom of the Layers panel, click the Create New Fill or Adjustment layer button ( ) and choose Hue/Saturation from the resulting menu. The Adjustment panel is displayed with the Hue/Saturation settings.
Using Hue/Saturation, you can change colors in your images. The default is set to edit the Master, or all the colors. You can change this to any other color, and use the Eyedropper tool ( ) to select a color, and change the hue, saturation, and lightness of that color.
4 In the Adjustment panel, choose Greens from the Edit drop-down menu and select the first eyedropper icon at the bottom of the Hue/Saturation adjustment panel. As you move the cursor over the image, you can see that the cursor is now an eyedropper. Click one of the green stripes of the girl’s shirt.
|
The Edit drop-down menu. |
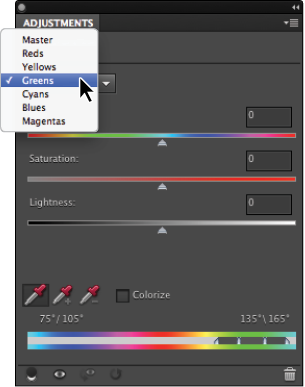
5 The Hue slider controls the color, the Saturation slider controls the amount of that color, and the Lightness slider controls the light and dark values. Move the Hue slider to approximately +124. The stripes turns blue. Have fun with this image and experiment dragging the Hue slider to different values. There is no other green in this image except for a small bow tie on the other girl’s shirt, so the rest of the image is not affected. If you are not seeing a change in the entire green area, you can refine the adjustment by dragging the sliders at the bottom of the Adjustments panel to expand or contract the color area being affected.
|
The image after modifying the hue and saturation. |
6 Choose File > Save. In the Save As dialog box, uncheck the Save in Version Set with Original checkbox, type blue_stripes_working in the Name text field, and change the format to Photoshop. Press Save.
7 Choose File > Close. If asked to save the changes, press No.
Working with selections
In this section, you will discover how to make selections, save selections, and move selections to a new layer. You will also use blending modes and adjustment layers to fix individual parts of the image.
1 If you are still in the Editor workspace, press the Organizer button ( ) at the top of the workspace. This reveals the Organizer.
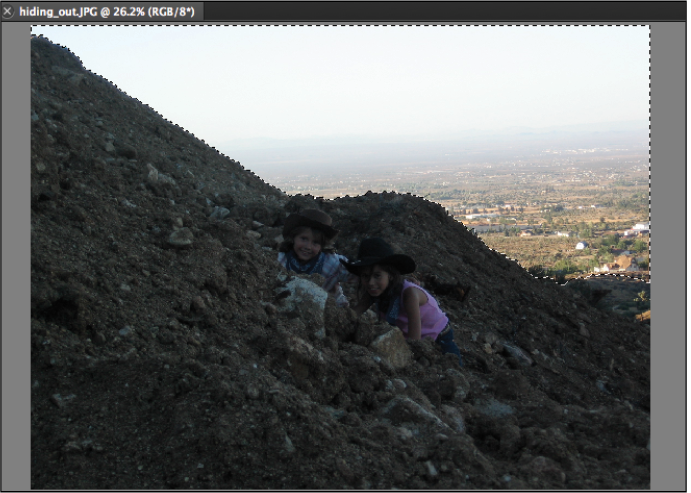
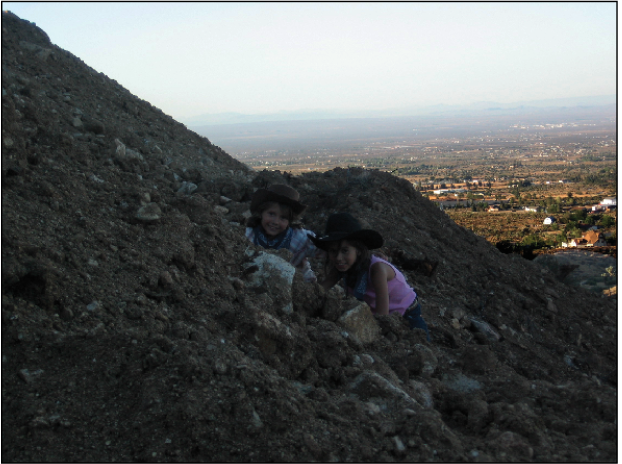
2 Locate and select the file named hiding_out.jpg. The image is too dark in the foreground, and too light in the background. Press the arrow to the right of the Fix tab at the top of the workspace and choose Full Photo Edit from the drop-down menu.
Using the Quick Selection tool
The Quick Selection tool makes selections for you based on color and texture. You can click with this tool to make selections, or you can also click and drag to paint a selection. The selection you make doesn’t have to be exact because the Quick Selection tool automatically and intuitively creates a selection.
1 Choose the Quick Selection tool ( ) from the Toolbox. The Quick Selection tool is based on a brush size. To change the size of the brush, you can click on the Brush picker and choose a larger or smaller brush. Click and drag over the sky and the valley up to the edges of the rocks to select the background. Press and hold the Alt key and the tool changes from select to deselect. If necessary, drag the tool and remove any unwanted areas of the selection.
|
The selection. |
Saving selections
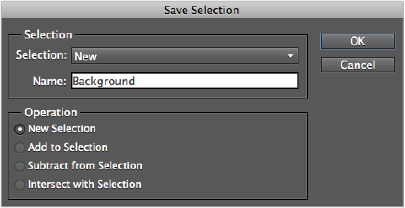
You can spend quite a bit of time making selections, so it makes sense to save selections in case you need to access them again. If you save the file as a .psd or a .tiff, selections are saved in the file. You will now save this selection so that you can use it later on.
1 Choose Select > Save Selection.
2 In the Save Selection dialog box, type Background in the Name text field and press OK.
|
Naming a saved selection. |
Moving selections to a new layer
You will now bring the selected area onto a new layer by itself so that you can use a blending mode to clean it up.
1 Choose Layer > New > Layer via Copy.
 | You can also use Ctrl+J (Windows) or Command+J (Mac OS) to copy your selected area to a new layer. |
|
A new layer added to the Layers panel. |
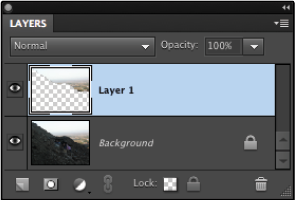
2 A new layer, named Layer 1, has been made for you. To darken the selection and blend Layer 1 with the Background layer, select Layer 1 and choose Multiply from the Blending mode drop-down menu. The color of the valley is more vivid, and its tonal range now contains the shadows that were previously missing.
3 To view what effect this has on the Background layer, press the visibility icon ( ) next to Layer 1 to hide or show the effect of that layer. Now you will correct the rest of the image. You will use a selection that you saved, invert the selection, and make an adjustment layer.
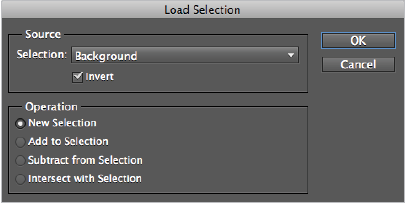
4 Choose Select > Load Selection.
5 In the Load Selection dialog box, make sure Background is selected and click the Invert checkbox so that the selection selects the opposite of the original selection, then press OK. Your selection is now back and active.
|
Loading a selection. |
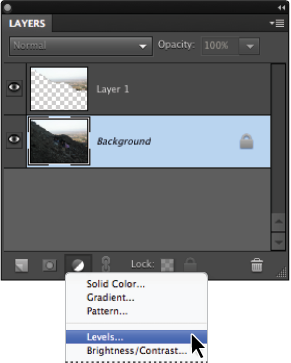
6 Choose the Background layer by clicking on it. This way, Photoshop Elements realizes that you’re on the Background layer before you make the adjustment layer. A mask will be made that affects only the selected area.
|
The foreground before the Levels dialog box is opened. |
7 Click the Create new fill or adjustment layer icon ( ) at the bottom of the Layers panel and choose Levels.
|
Creating a new adjustment layer. |
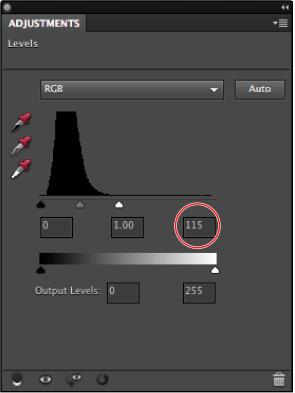
9 In the Levels Adjustment panel, click the white slider and drag it to the left to an approximate value of 115, or type 115 in the white text field in the Input levels section.
|
This is what the value should look like for RGB. |
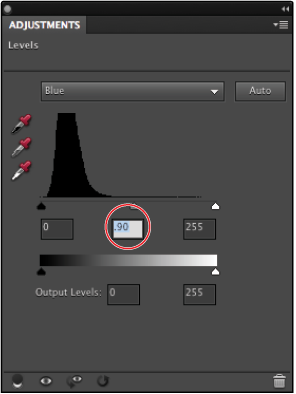
10 The image still looks too blue. Choose Blue from the Channel drop-down menu. Drag the middle slider to approximately .90 to decrease the blue.
|
Modifying the Blue channel. |
11 Now the image looks too yellow. You will now go into the Green channel to fix it. Choose Green from the Channel drop-down menu. Drag the middle slider to the right to approximately .93 to decrease the yellow in the image. If you’d like to review the changes, toggle the visibility icon of the Levels 1 or Layer 1 layers to review your work. Notice the mask icon on the Levels layer. Any time you make a selection prior to choosing an Adjustment layer, a mask is created from the selection to isolate the affected area without changing the area outside the selection.
12 Choose File > Save. In the Save As dialog box, uncheck the Save in Version Set with Original checkbox, type hiding_out_working.jpg in the Name text field and change the format to Photoshop. Press Save.
| Saving in the JPEG format will remove the saved selection from the file as well as the layers. If you want to keep a working file with the selection and layers, you should save it as a .psd file. |
|
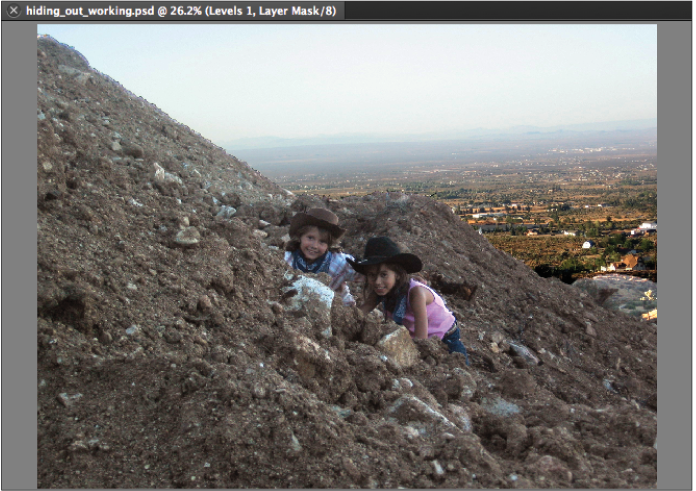
This is the foreground after adding the adjustment layer and the background after applying the blending mode. |
13 Choose File > Close. If asked to save the changes, press No.