Photoshop Elements Tutorial: Importing your Photos into Adobe Photoshop Elements
What you’ll learn in this Photoshop Elements Tutorial:
|
This tutorial provides you with a foundation for working with importing into Adobe Photoshop Elements. It is the first lesson in the Adobe Photoshop Elements 10 Digital Classroom book. |
Photoshop Elements Tutorial: Importing your Photos into Adobe Photoshop Elements
Adobe Photoshop Elements is an easy-to-use solution for organizing and editing your digital photos. You will be up-and-running, creating beautiful photographs before you know it. To start, you’ll need to import images from your camera or computer.
Starting up
You will work with several files from the Lessons folder in this lesson. Make sure that you have downloaded the Lessons folder onto your hard-drive. In order to access these files, you need to import them, which you will do in this lesson. Before you start, note that the Photoshop Elements Editor remembers the last panel layout that you used. Before starting, make sure your tools and panels are consistent with the examples presented in these lessons by resetting the panels, by choosing Window > Reset Panels within the Editor.
If you are ready to start working with your own images, you can jump ahead to “Adding Files and Folders to the Organizer” found later in this lesson to start working with files that came with this book.
How Photoshop Elements works
The fact that you’re reading this book indicates that you probably already own or are considering purchasing a digital camera. It’s probably also accurate to say that you’ve been taking photographs and truly enjoying the flexibility that digital photography has to offer. The ability to shoot as many images as you like, or at least as many as will fit onto your camera’s memory card, is one advantage that digital photography has over traditional film cameras. Another advantage is that you can choose which images to keep and which ones to delete from your camera’s memory card, instead of sifting through the photos that you had developed at your local photo store, picking out the good ones, and throwing away the bad ones. With digital photography, you only pay for the good photos!
So you’ve figured out how to shoot pictures with your digital camera but you’ve found that the clunky interface on your camera requires a lot of time to sift through the images in order to delete the poor photos that you don’t want. In addition, your photos may be accumulating on your camera’s memory card, requiring you to constantly remove images to make room for new ones. These are only a few of the problems that people are faced with in this world of digital photography, and this is where Adobe Photoshop Elements 10 fills a void.
Photoshop Elements provides you with the ability to import, organize, adjust, and output your images in limitless ways. Photoshop Elements makes organizing and editing photos a snap, by giving you the tools needed to accomplish everyday tasks without the complexity of the full version of Photoshop. With Photoshop Elements, you can utilize keyword tags, ratings, captions and other features to identify your images so that you can search for and find them easily in the future. You’ll never lose an image again. Let’s get started!
The welcome screen
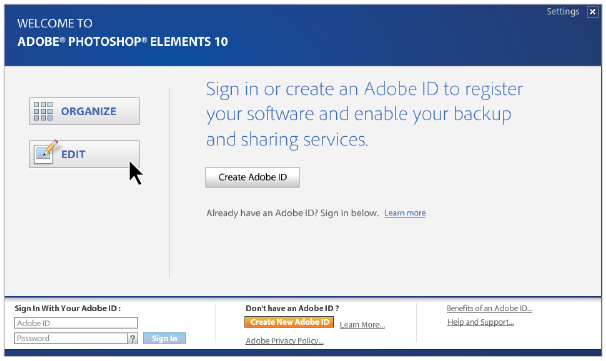
When you launch Photoshop Elements, the Welcome screen opens automatically. The welcome screen is a gateway to the workspaces that are available within Photoshop Elements. Workspaces are different environments built into Photoshop Elements that allow you to perform different tasks. You’ll get a closer look at workspaces later in this book.
After launching Photoshop Elements, the welcome screen will be displayed prominently in the center of your screen. The welcome screen is the launch pad from which you will navigate to different areas of Photoshop Elements. There are two main categories available in the welcome screen:
Organize ( ): This is like a digital filing cabinet. You can rename your files, add keyword tags, add ratings, and categorize your photos. Lessons 1 and 2 cover the Organizer.
Edit ( ): This is where you can make adjustments to your photos. Fix exposure, color, and contrast, remove redeye, and much more. Lessons 3, 4, and 5 are focused on editing.
|
From the Adobe Photoshop Elements Welcome screen, you can launch the Organizer, Editor, or sign on to Photoshop.com to share your images. |
Getting photos into the Organizer using the Photo Downloader
The Photoshop Elements Organizer is your creative hub. It can be used to organize your entire photo library, as well as perform a few quick editing tasks. It is not a simple file browser like your operating system uses; it is more of a photo management system, allowing you to organize, tag, and manipulate content. Before you can use it to the fullest, you must first import your images into the Organizer.
Getting photos from a camera or card reader
Photos that you shoot with your digital camera are not usually stored on the camera, but on a removable memory card plugged into your camera. To get the photos from your camera onto your computer, you must have a physical connection from your camera to your computer. This connection is usually in the form of a USB cable supplied with your camera. With most cameras, it is also possible to remove the memory card from the camera and insert it into a card reader, which in turn plugs into your computer. This method generally offers faster importing of your photos, but either method ultimately yields the same results. For details on how to connect your camera to your computer, consult the instructions that were provided with your camera. Photos are copied onto your computer using the Photo Downloader. The Photo Downloader allows you to choose the location on your computer where you would like the files copied during import.
Import photos automatically
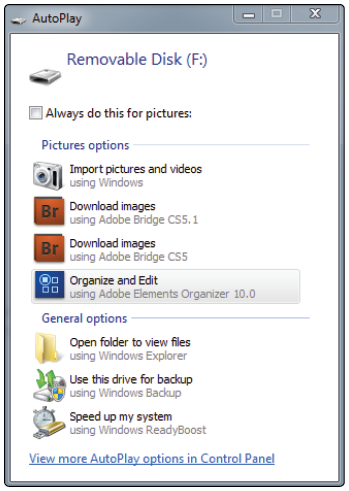
When you plug your camera or card reader into your computer, Windows prompts you with a dialog box asking what you want to do. Depending on the applications that you have installed, your dialog box will look slightly different than the one shown in the figure below. If you choose Organize and Edit using Adobe Elements Organizer 10, the Adobe Elements 10 Photo Downloader displays on your screen.
|
The AutoPlay dialog box appears when you connect a camera or card reader on a Windows computer. This dialog doesn’t appear on Mac OS. |
Import photos manually
Depending on your configuration, your computer may not display a dialog box asking you which application to use to access the photos on your camera’s memory card, and you may have to launch the Photo Downloader manually. To do so, press the Organize button ( ) from the welcome screen, then follow the steps below to import the photos.
1 Select File > Get Photos and Videos > From Camera or Card Reader or use the keyboard shortcut Ctrl+G (Windows) or Command+G (Mac OS).
2 From the drop-down menu in the Source area, choose the digital camera or card reader.
|
Once you have selected a device, all photos on it are loaded into the viewer. |
3 In the Import Settings section, press the Browse button to choose the folder you would like to copy your photos to. If you are using a single folder to hold all your images, you can create a subfolder based on a variety of options in the Create Subfolder(s) drop-down menu.
4 If you would like to automatically rename the photos as they are being copied to your computer, choose a renaming method from the Rename Files section.
5 Set the Delete Options to control what happens to the original photos on the camera or card reader after they are copied to your computer.
6 Press Get Media to copy your photos. Press Cancel if you are not connected to a camera or card reader. The Photo Downloader
During import from a camera or card reader, Photoshop Elements uses the Photo Downloader. The Photo Downloader aids you when importing files into Photoshop Elements. This dialog box has two different modes: Standard and Advanced.
Standard mode
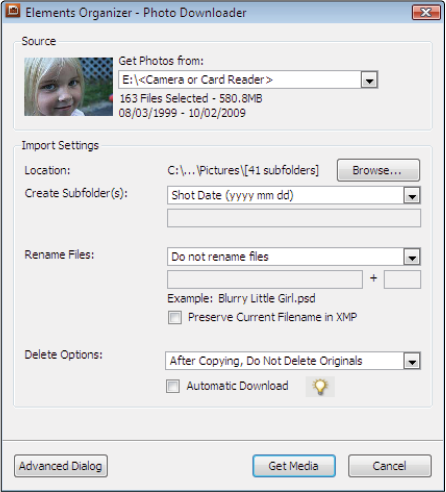
In Standard mode, the Photo Downloader provides you with some basic options. The Source section allows you to define a specific device (camera or card reader) from which to import files.
|
Standard mode in the Photo Downloader offers a quick and easy way to import your photos. |

The Import Settings section allows you to determine what occurs during import as you’re importing images.
Location: The location on your hard drive where you would like the files to be imported.
Create Subfolder(s): Organizes the photos into subfolders based on a variety of date formats, including shot date and import date.
Rename Files: Renames the files during import so that they correspond to the date the photos were taken, today’s date (current date), or a custom name.
Delete Options: Determines what to do with the original photos on the camera or card reader once the files have been imported onto your hard drive. You have the following choices: Do Not Delete Originals, Verify and Delete Originals, or Delete Originals immediately after copying them.
Advanced mode
In advanced mode, thumbnail previews of all the images on the camera or card reader are displayed and you can choose which photos you would like to download to your hard drive. Additional options are also available in the Advanced Options section.
|
Advanced mode in the Photos Downloader offers additional options, such as the ability to apply metadata to images during import. |
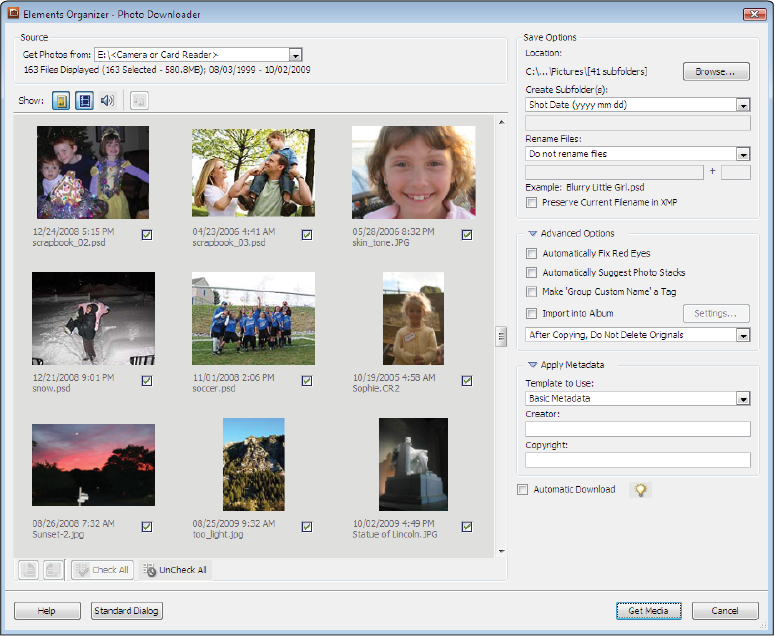
Automatically Fix Red Eyes: Analyzes your photos on import and automatically fixes red eye in any image.
Automatically Suggest Photo Stacks: Suggests that multiple photos that appear similar be grouped together in a stack.
Make ‘Group Custom Name’ a Tag: Applies the custom name tag of the specified group to the selected photos. Use this option only if you have assigned custom groups.
Import into Album: Allows you to import the photos into an existing album, or allows you to create one during import.
The Photo Downloader also makes it easy to apply metadata to your photos during import. Metadata is information about the photos that you are importing, such as the photographers name, the date the image was taken, copyright status, and more. Metadata is discussed in greater detail in Lesson 2, “Organizing Your Photos.” Below are options you can choose when applying Metadata.
Template to Use: Allows you to use a pre-configured metadata template to automatically apply common metadata to your images.
Creator: Type the name of the person who took the photograph.
Copyright: Type copyright information related to the images being imported.
Click the Automatically Download checkbox to automatically launch the Adobe Photo Downloader and import the photos from the card using the default preferences.
Continue to the next Photoshop Elements Tutorial: Get photos from a scanner in Photoshop Elements >