Photoshop Tutorial: Using the Vanishing Point filter in Photoshop CS6
What you’ll learn in this Photoshop Tutorial:
|
This tutorial provides you with a foundation for working with Adobe Photoshop vanishing point filters. It is the eleventh lesson in the Adobe Photoshop CS6 Digital Classroom book. For more Adobe Photoshop training options, visit AGI’s Photoshop Classes. |
Photoshop Tutorial: Using the Vanishing Point filter in Photoshop CS6
The Vanishing Point filter simplifies the task of editing images that are in perspective, such as the sides of a box. With the Vanishing Point filter, you can easily add additional elements to any type of artwork that is composed of flat planes. With this filter, you first define the planes in an image, and then apply edits by painting, cloning, copying, pasting, and transforming your image. The planes you define control the perspective of the edits you make, giving your image a realistic perspective effect.
In this exercise, you’ll map a pre-made design to a box so that three sides of the box are showing.
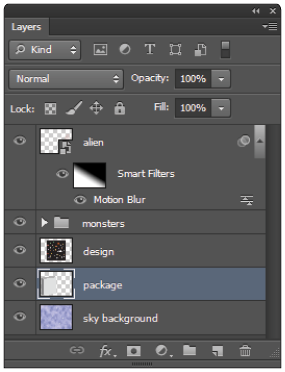
1 Turn on the Visibility icon ( ) next to the design and package layers to make them visible. Using the Layers panel, turn off the visibility of both the monsters layer group and the alien layer.
|
Showing the design and package layers. |
You will now cut the image on the design layer so that it can be pasted into the Vanishing Point dialog box.
2 Hold down the Ctrl (Windows) or the Command (Mac OS) key, and click on the design layer thumbnail in the Layers panel. A selection is now visible around the package design.
3 Click on the design layer to make sure it is the active layer, then choose Edit > Cut. The package design is now on your clipboard.
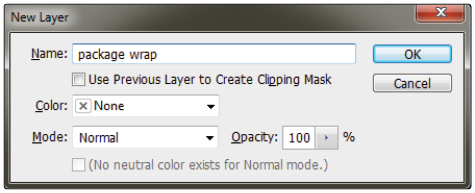
Before using the Vanishing Point filter you will want to create a blank layer. By creating a blank layer, you can have the effects of the vanishing point separated from the rest of your image, allowing you to turn off or on the results of the filter.
4 Click on the package layer and then Alt+click (Windows) or Option+click (Mac OS) on the Create a New Layer icon () in the Layers panel. The New Layer dialog box appears.
5 Type package wrap into the Name text field and press OK. Make sure that the package wrap layer is active.
|
Create a new layer for the Vanishing Point results. |
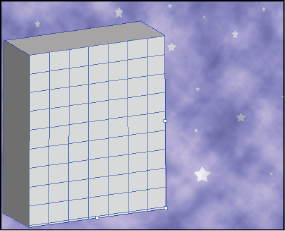
6 Choose Filter > Vanishing Point. The Vanishing Point dialog box appears. In the first part of this exercise, the perspective planes are made for you. You will create one yourself later.
|
This file has a pre-built perspective plane. |
7 With the Vanishing Point dialog box open, press Ctrl+V (Windows) or Command+V (Mac OS) to paste the package design you cut in step 3. When you paste, the tool changes to the Marquee selection tool.
8 Click and drag the pasted design over the perspective plane. The design artwork maps to the perspective plane. Keep the Vanishing Point dialog box open for the next part.
|
Click and drag the pasted artwork on the plane. |

Building your own perspective planes
A grid defines the four corner points of a perspective plane. When building a perspective plane, it helps to have objects in your image that can define your plane. In this example, the package itself offers a good source from which you can create your perspective plane.
Now that you know the capabilities of the Vanishing Point filter, you’ll delete the existing plane and create your own.
1 Press and hold down the Alt (Windows) or Option (Mac OS) key. This turns the Cancel button into a Reset button. Click Reset.
2 Select the Edit Plane tool ( ), then click on the existing planes and press the Delete key. The perspective planes are deleted.
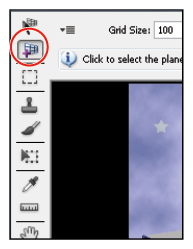
3 Select the Create Plane tool ( ). You’ll now create a new plane by defining each corner of the plane.
|
The Create Plane tool. |
4 Click on the top left of the front of the box, then on the top right, then on the bottom right, and once more on the bottom left. Notice that a blue grid indicates a valid plane. If your plane is red or yellow, it is invalid; use your Edit Plane tool to readjust your corners until the grid is blue.
When drawing a plane, you can temporarily hold down the X key on your keyboard to magnify an area for more precise drawing of the plane. |
For a plane to be valid, two sides of the plane should be parallel, while the other two sides show the perspective.
Building an attached plane
You can control the angle of a plane, and you are not restricted to 90 degree angles.
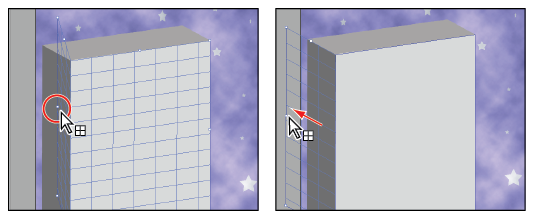
1 Make sure that the Create Plane Tool is selected. Press and hold down the Ctrl (Windows) or Command (Mac OS) key, and drag the left-middle edge node toward the back edge of the box. This creates a perpendicular plane that will be used for the left side of the box. Don’t worry if it is not aligning at the exact angle. You will fix that in the next step.
|
Ctrl/Command+click. Drag out a new perpendicular plane. |
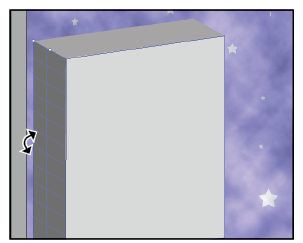
2 Press and hold the Alt (Windows) or Option (Mac OS) key, and position your cursor over the left-middle edge node; a double-headed curved cursor appears. Click and drag either up or down to adjust the angle of the plane. You may need to zoom in to get this just right. Press X on the keyboard to temporarily zoom in for a better view. If you are on the Mac OS, it might be easier to hold down the Option key and drag the upper-left corner into place, and then Option drag the lower-left corner into place.
You are adjusting the plane so that it follows the left side of the box. As you adjust the plane, you may find that you need to release the Alt/Option key and adjust the middle edge node so that it is not extending beyond the left edge of the box.
|
Alt/Option+click and drag to change the angle |
3 Choose Edit > Paste to paste the package design in the Vanishing Point dialog box, or use the keyboard shortcut Ctrl+V (Windows) or Command+V (Mac OS).
4 Click and drag the design over the box. As it appears over the grid, the sides of the design conform to the sides of the grid. Notice how the image automatically adjusts itself to the contours of the perspective planes.
5 Make sure the image is exactly where you want it positioned on the plane, then press OK.
6 Make the monsters layer group visible by clicking to the left of the monsters folder in the Layers panel. The Visibility icon appears, and you see the contents of the group. Then click to the left of the alien layer to reveal the entire design.
7 Choose File > Save. Congratulations! You have finished this lesson.