Photoshop Elements Tutorial: Working with audio in Photoshop Elements
What you’ll learn in this Photoshop Elements Tutorial:
|
This tutorial provides you with a foundation for working with Adobe Photoshop Elements graphics. It is the tenth lesson in the Adobe Photoshop Elements 10 Digital Classroom book. |
Photoshop Elements Tutorial: Working with audio in Photoshop Elements
The photos you choose are the most important part of any slide show. However, they aren’t the only part: text and graphics are often added to a slide show to enhance the effect of certain slides or to add emphasis to important parts of your images. Another important factor for creating a good slide show is your audio. While you don’t have to use audio when creating a slideshow, good audio can help to establish the mood of your project. Audio can be added to a slide show, either as background music, commentary track, or as a voiceover to match specific slides.
Adding audio
To add an audio file that plays in the background of your slide show, you can do so very easily using the Add Media button ( ). Audio plays as your slide show progresses, and automatically stops at the end of the show.
1 Press the Click Here to Add Audio to your Slide Show button at the bottom of the storyboard.
|
Click to add audio to the slideshow. |

2 Navigate to the airshow folder in the Lessons folder and select airshow soundtrack.mp3. Press Open and the audio file will appear at the bottom of the storyboard on the audio track. Preview the slideshow by pressing the Play button at the bottom of the viewer. Press the pause button to stop the slideshow.
3 If your slide show is longer than your audio track, the audio track will automatically repeat. The audio is a little too loud, but you can adjust this. Click the audio track, airshow soundtrack.mp3 to highlight it in blue and lower the audio slider in the Properties field in the Panel bin by dragging the slider to the left. Press the Play button above the audio slider to hear the music play as you are adjusting it. Press the pause button above the audio slider to stop the music playback.
 | If you want to auto adjust the duration of each slide to play for the entire duration of your audio track, press the Fit Slides To Audio button ( |
 ) at the top of the Storyboard.
Adding narration
If you have a microphone attached to your computer, you can use it to add narration to one or more slides in your project. Unlike background audio, the narration track is attached to each slide and automatically changes the slide’s duration. The narration interface looks very similar to a standard tape recorder, with controls to record, stop, and play. It also includes controls for inserting saved audio tracks as narrations and deleting saved narration tracks.
|
The recorder is just like a physical tape recorder. |
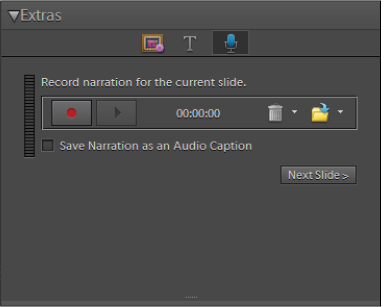
1 From your Panel bin, click the Narration tool ( ) to activate it.
2 Select the slide you would like to add the narration to, and press the Record button.
3 When you are finished with your narration, press the Stop button.
| Adding narration can increase the duration of the slide. If your narration is longer than the slide’s display duration, Photoshop Elements automatically increases the slide’s display length. |
4 Press the Play button to listen to the narration you have just created. If you are happy with it, move on to the next slide. If you are not happy with the narrative track, press the Delete button ( ) to delete it.
| If you are using a soundtrack with your slide show, it can interfere with the viewer’s ability to hear the narration, if the soundtrack is too loud. |
Choosing an output option
Once you have created your slide show, you need to decide how to distribute it to your audience. Photoshop Elements supports a variety of distribution methods.
Once you have decided on a file type and decided on the specific settings you want, press the Output button to build your file. Once the file has been created, you can do whatever you like with it; you can e-mail it to your family and friends, burn it to disk, or save it on a flash drive.
Save as a file
This option saves the slide show as either a Windows Media Video (.wmv) or a Portable Document Format (.pdf) file. For the WMV format, you must specify a file size (larger sizes equate to larger but better-quality files). The PDF option does not support certain slide show features, most notably Pan & Zoom, and some transitions will appear different, such as the clock wipe, which becomes a fade when converted to PDF.
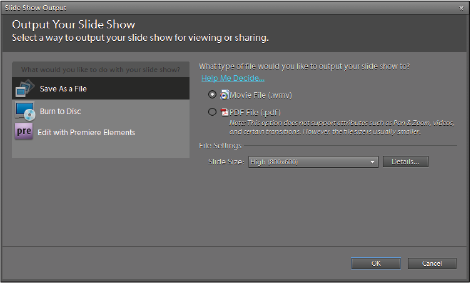
1 Press the Output button ( ) in the Options bar at the top of the Slide Show Editor.
2 In the Slide Show Output dialog box, choose Save As a File from the list on the left. Choose Movie File (.wmv) as the type and High (800x600) from the Slide size pull-down menu. Press OK.
|
Setting options in the Slide Show Output dialog box. |
3 In the Save Slide Show dialog box, navigate to the Lessons folder and press Save. When Photoshop Elements has finished creating the Windows Media file, you will be given the choice to import it into your Catalog. Press Yes.
4 Choose Save Project from the Options bar, then close the Slide Show Editor to return to the Organizer.
Burn to disk
This option allows you to burn the slide show to either a VCD (video CD) or DVD for display on a standard console DVD player, depending on your hardware configuration. To create a VCD, which can play on most modern DVD players, you need a drive capable of burning CD-ROMs, whereas for the DVD, you need a DVD burner.
Edit with Premiere Elements
As the name implies, this export feature sends your project to the Premiere Elements application (if you have it installed) where you can perform additional video editing to the slideshow.
Creating a photo calendar
You can use your photos to create a wide variety of different projects, including a photographic calendar. Photo calendars can be ordered directly through Photoshop Elements using the Kodak online service or they can be printed directly to your desktop printer. You will need to register with the Kodak online service to order bound calendars. You need a valid e-mail address to register for the Kodak service. Doing so is free, but you will need a valid credit card to place an order.
|
A photo of the calendar showing a mom and her little girl. |

| You need the latest version of the Flash Player plug-in to use the Web features of the calendar creation process. |
1 Make sure the Slide Show window is closed, and in the Organizer, type California into the search text field. This isolates only the images with the word California in the title or tag.
2 Click on the first image in the Photo Browser, and then press Ctrl+A (Windows) or Cmd+A (Mac OS) on the keyboard to select all the images.
You can also select the first image, hold down the Shift key on the keyboard, and select the last image in the group to select them all.
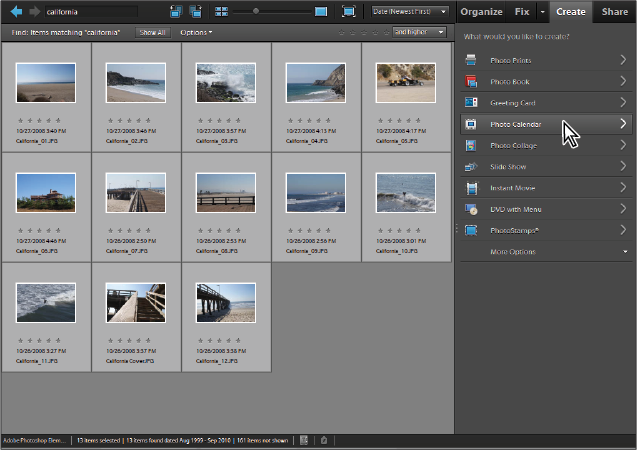
3 From the Create tab on the right of the workspace, press the Photo Calendar button. This displays the Photo Calendar window.
|
The Create tab offers a wide variety of project options including the Photo Calendar option. |
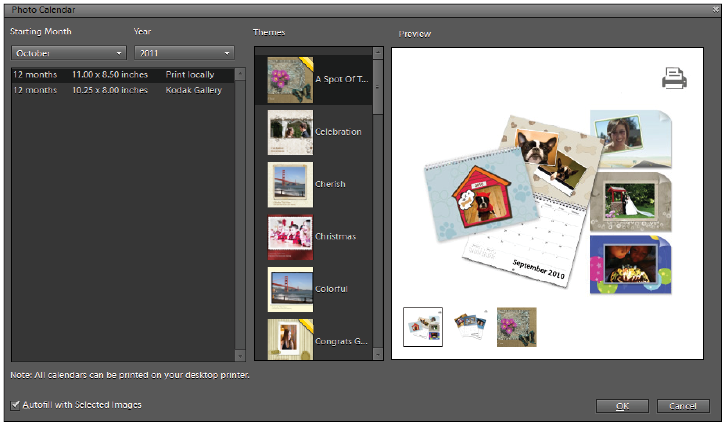
4 The Photo Calendar dialog box allows you to define parameters for creating your calendar. In the left pane, choose whether you want to print your calendar locally, or send to the Kodak Gallery where your calendar will be created and mailed to you. Whichever option you choose, both can be printed to your desktop printer. In this example, the Kodak option was chosen. In the upper-left corner of the dialog box, you can also choose a month and year that your calendar will begin on. In the second pane, choose a theme for your calendar. Notice that as you change the theme, the preview updates in the Preview pane. When you are happy with your choice, click the OK button. Photoshop Elements generates your calendar using the images that you initially selected in the Organizer.
|
The Photo Calendar dialog allows you to define parameters for creating your calendar. |
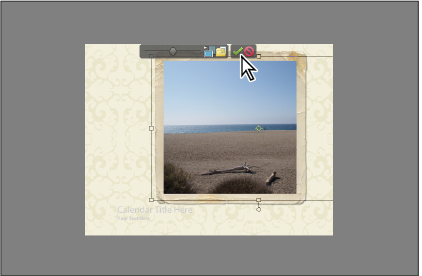
5 After the calendar is created, you can make adjustments to each month. Click on an element (image or text) with the Move tool ( ) and drag to reposition an element.
|
After the calendar is created, you can click and drag on an element to reposition it within the layout. |
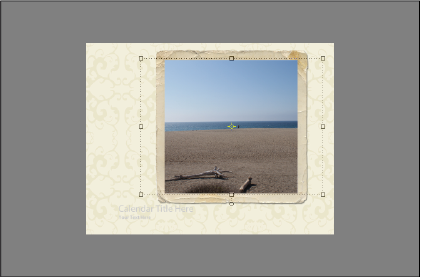
6 To edit an image, double-click on an image and a slider appears that allows you to change the size of the photo. Click and drag on the image to reposition the photo within the placeholder frame. Click the green checkbox to confirm the change.
|
Double click on a photo to change the size and position within the placeholder frame. |
7 To add your own text to the layout, click on the Text tab to the right of Pages and triple-click on the placeholder text and enter your own text in its place. With the text highlighted, you can change several properties of the text such as the size, font, color, alignment and other options in the Options bar at the top of the Elements interface. Click the green checkmark to confirm your text changes.
|
The customized layout. |

8 The Create panel provides an easy way to further customize your layout. You can navigate from page to page in the Pages section by simply clicking on a new page to display it in the main screen. The Layouts category allows you to change the overall layout of the page. The Artwork category provides artwork that can be dragged and dropped onto your layout to create interesting effects. Finally, the Text category provides a means by which you can refine and adjust the text in the layout.
9 Double-click on the text on the first page of the calendar. Type Southern California into the Title text field and your name in the Your text here text field.
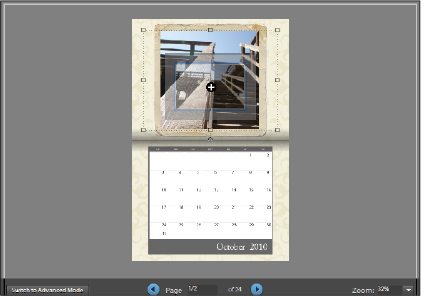
10 Go to page 2 of the calendar. Double-click on the image that was placed on this page. In the option bar that appears above the image, choose Get a new photo to place in frame button ( ). In the Choose photo dialogue box, double click on the image named California Cover. This replaces the existing image. Adjust and refine this image as needed. Repeat this process until your calendar is complete.
|
Drag an image from the Project Bin onto the layout to replace an image with a new one. |
11 Press the Order button if you’d like to order your calendar through the Kodak web site. This process can take several minutes; during this time you will be guided through the account creation process to place your order. Otherwise press the Done button to finish editing the calendar. A dialog box appears indicating that you should save the project. Click Yes. In the Save As dialog box, name the project Calendar and choose Photo Project Format from the drop-down menu. Make sure that the Include in Elements Organizer checkbox is enabled and save it into your Lessons folder. Click the Save button.