Premiere Pro tutorial: Adding a clip description in Premiere Pro
What you’ll learn in this Premiere Pro Tutorial:
|
This tutorial provides you with a foundation for working with Adobe Premiere Pro clip descriptions. It is the second lesson in the Adobe Premiere Pro CS5 Digital Classroom book. For more Adobe Premiere Pro training options, visit AGI’s Premiere Pro Classes. |
Adobe Premiere Pro Tutorial: Adding a clip description in Premiere Pro
You can edit some of the columns. For example, you can edit the Description column directly from the Project panel. Clip descriptions can be very helpful especially when working on longer, more complex projects or when working in a team environment. The Description column of the Project panel contains an editable text field that can be used to hold a wide variety of information such as a content description or to note intended usage.
1 With the Project panel still expanded to the full size of the screen and active, click the Description column and drag it to the left. As you drag the column name, a dark highlight appears between each pair of names.
Drag the Description column until this highlight is between the Name and Label columns, then release it to move its position.
|
You can drag any column title to the left or right to change the arrangement of the Project panel’s columns. |
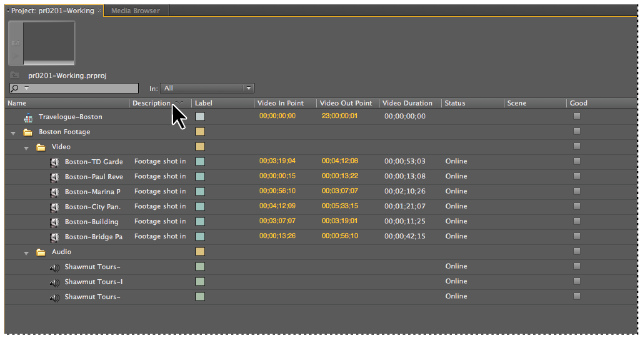
2 You have repositioned the Description column, but there is not enough room in the column to read all the text.
Place your cursor on the dividing line between the Description and Label columns. When the cursor changes to a double-headed arrow, click and drag to the right to change the width of the Description column and move all the other columns.
After enlarging the Description column, repeat these steps for the Name column so you can see the full name of each audio and video file.
|
You can quickly edit visually the width of each column directly from the Project panel interface. |

3 Locate the clip named Boston-TD Garden.mov. You can edit a clip’s Description property any time.
Click in the clip’s description field and replace the current generic description with the following text: “Pan from left to right past the sports arena.” Press the Enter (Windows) or Return (MacOS) key on your keyboard to deselect this clip’s text field and automatically select the next clip’s description.
 | If you do not want to select the next clip’s description, you can click any empty area of the project panel with your cursor to deselect the active text field. |
4 Press the tilde (~) key on your keyboard to return the Project panel to its normal screen size.
5 Choose File > Save or press Control + S (Windows) or Command + S (MacOS) to save the project file.
In your own project, you should consider giving each clip in the project panel a unique description. This can include any information, such as time of day, the subject of the shot, or notes on camera position or movement.
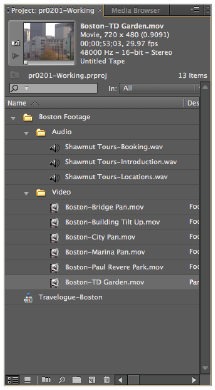
Organizing content by columns
The columns of the project panel are used to control how the different items in the panel display. You can arrange your clips based on the content of any column.
1 In the Project panel, click the Name column title bar to make it the active panel. The active panel shows a downward pointing chevron next to the column name.
2 Click the Column name again to reverse the standard display order and notice how items reverse their display order in the panel. You can choose the order you prefer; for this project, place the Boston Footage bin at the top of the display.
|
The footage display in the Project |
3 Choose File > Save or press Control + S (Windows) or Command + S (MacOS) to save the project file.
You are now done working with the project.
Choose File > Close Project to close this project and return to the Premiere Pro welcome screen.
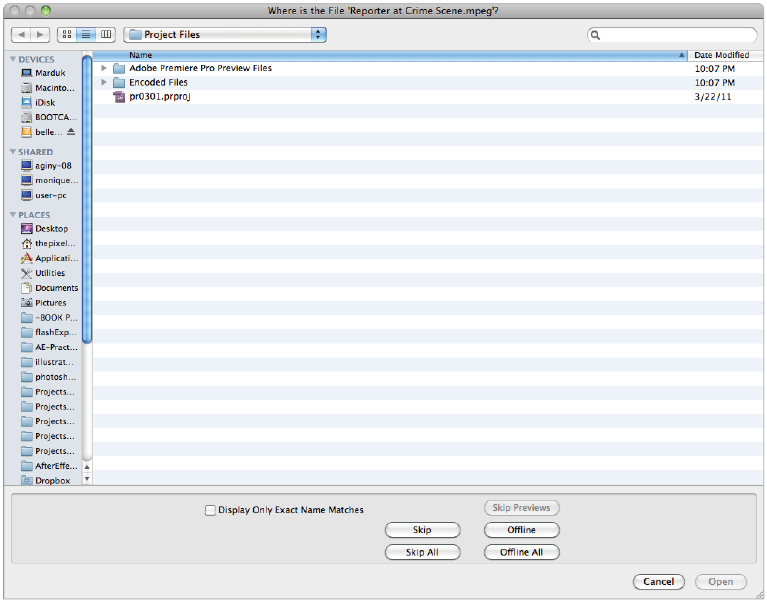
Locating missing media
Premiere Pro creates a link between your project files and the files that you import into the Project panel. This linkage system allows you to have a very small project file, but at the same time requires that you manage the media you are using in your projects. If you move, rename, or delete files that you are using in a project you will receive a missing media warning when Premiere Pro starts up. You should always locate any missing files before attempting to proceed with your project.
The process for locating missing files is automatic and will help you find video, audio, still images, and even preview files.
1 When presented with a file browser, verify the file name at the top of the dialog box. This is the file that you are currently trying to locate.
|
The application will automatically open the dialog box when a project with missing files is opened. |
2 Navigate to the missing file, highlight it, and then press the Open button to re-link the file.
|
When all missing files have been recovered the project will open. |
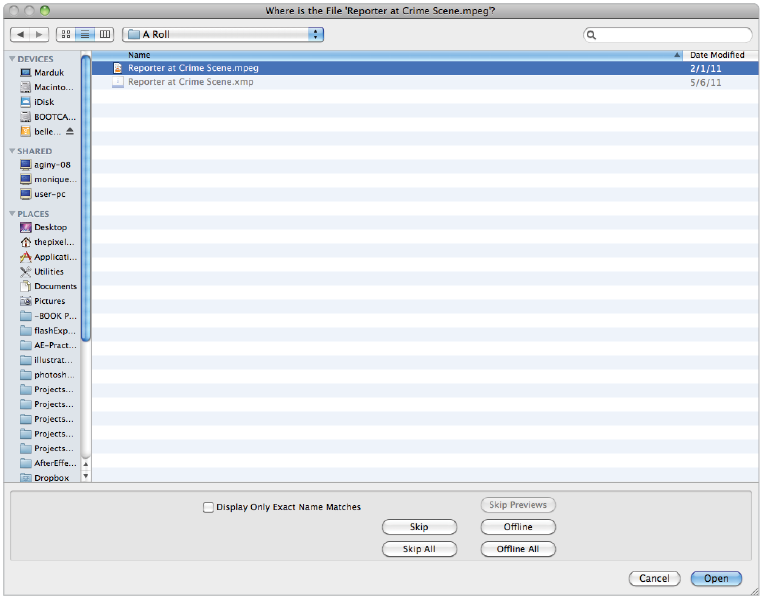
If your missing files are still in the same relative folder structure as when they were first imported into your project then Premiere Pro should locate them all, once it knows the location of the first one. If it cannot automatically find other missing files you will have to locate them manually. Once all missing files have been found or skipped, the project will open.
There are technically three options when attempting to locate missing files; you can find the file and open it, skip the specific file, or set the file as offline. Offline files can be brought online by right-clicking on them in the Project panel and choosing Link Media from the menu that appears. In addition to the ability to skip and offline individual files, you also have buttons to skip and offline all files the application is currently attempting to locate.